Music production works best when you treat it like a repeatable process: define the goal, build the arrangement, clean up the mix, and export a version that actually translates on real devices. This guide shows how to produce music step by step, and where MelodyCraft can help when you want to turn an idea into a first draft faster.
From here, we move from the big-picture idea into the practical part: how to set your brief, make steady progress, and decide where MelodyCraft fits when you want a clean first draft instead of a blank canvas.
Need a faster way to build a first track?
Turn ideas into a usable demo in MelodyCraft before you spend hours polishing.
Turn an idea into a full song structure (not just a loop)
Record clean vocals/instruments without ruining takes
Mix with a “levels-first” method that translates to phones and earbuds
Export a streaming-ready master without chasing loudness
Use an AI song generator as an accelerator (idea → demo → edit), not a replacement for your taste
What counts as a “finished first track” in this article: a 2–4 minute song with a complete arrangement, no clipping, and playback that sounds “reasonable” on earbuds, phone speaker, and car audio.

What is music production (and what counts as “done” for a first track)?
Music production isn’t just “making a beat.” It’s the full process of taking a musical idea and shaping it into a track people can listen to anywhere: idea → writing/arrangement → recording (if needed) → mixing → mastering/export → release. You can be a producer even if you never record a microphone—electronic music, sample-based music, and MIDI-driven productions are still “real” productions.
For beginners, the biggest trap is perfectionism: you tweak a loop forever, compare yourself to commercial releases, and never finish. A healthier approach is to define “done” with measurable standards.
A practical “done” standard for your first track:
Complete structure: intro + main sections + ending (even if simple)
No technical failures: no clipping/red meters on master, no harsh distortion
Balances translate: kick/bass audible on earbuds, vocals/lead not buried
Exported properly: WAV/AIFF for archive + MP3/AAC for sharing
One intentional vibe: you can describe it in one sentence (genre + mood)
If you’re unsure whether you’re “done,” do a 3-device test: earbuds, phone speaker, and a car (or cheap Bluetooth speaker). Fix only the biggest problems, then export.

Mixing vs mastering: what’s the difference and why it matters
Mixing is making all the tracks inside your song work together (levels, panning, EQ, compression, space). Mastering is making the final stereo mix consistent and release-ready (final loudness management, tonal balance, translation, and spacing between tracks if an EP/album).
Common beginner misconceptions:
Mistake: “Mastering will fix my muddy mix.”
Reality: mastering can polish, but it can’t re-balance a kick that’s too loud or a vocal that’s too quiet.
Mistake: “Louder = better.”
Reality: streaming normalizes loudness; clarity and punch usually win over raw volume.
Quick decision box: what should you do next?
If one instrument masks another → mixing problem
If the whole song feels dull/boomy everywhere → mixing first, then light mastering
If your mix is solid but the track feels a bit quiet/uneven vs references → mastering/export stage

What do you need to start producing music at home on a budget?
To start how to produce music at home, you don’t need a perfect studio—you need a minimal setup you can finish a whole song on. Many great producers started with laptop speakers and cheap headphones, then upgraded later.
Minimum viable setup (finish-a-song kit):
A computer (or even a tablet/phone with a DAW app)
Headphones you can trust (even basic wired ones)
A DAW (software to record/edit/mix)
Optional but helpful: audio interface, mic, MIDI keyboard
The real rule is: use what you already have until you finish one track. Buying gear feels productive, but finishing tracks is what builds skill.
Here’s a simple budget ladder:
If you’re recording vocals, prioritize a quiet corner and consistent mic distance before you spend on fancy plugins.
What is a DAW and which one should beginners pick?
A DAW (Digital Audio Workstation) is where you compose, arrange, record, and mix. Your “best DAW” is the one you’ll open every day—so don’t overthink it. If you want a deeper overview of beginner-friendly learning paths, this beginner music production guide is a helpful reference point for building fundamentals.
Use these 5 criteria to choose:
Learning resources: tutorials, courses, community, templates
Included instruments/sounds: enough to finish songs without extra spending
Workflow fit: loop-based vs linear recording vs hybrid
System compatibility: macOS/Windows, CPU needs, mobile support
Price model: free tier, one-time purchase, subscription
A simple “which type are you?” guide:
You want fast loop-building and electronic production → choose a DAW with strong clip/loop workflow
You want to record vocals/instruments often → choose a DAW with strong audio comping + editing
You want to do everything (beats + vocals + mixing) → choose a balanced all-rounder and commit
Whatever you pick, commit for 30 days and finish a short track—even 60–90 seconds. Switching DAWs early usually delays progress more than it helps.
How to produce music step by step (a simple workflow that prevents “loop hell”)
When beginners ask how to produce music, the real challenge is moving from a great 4–8 bar idea to a full song. The fastest fix is to follow a structure-first workflow (details later). This 7-step path aligns with common production frameworks like the one described in Bay Eight’s breakdown of the music production process, but simplified into a “do-this-next” checklist.
The 7-step beginner workflow (do it in order)
Set BPM + key (10 minutes)
Pick a tempo that matches your genre.
Choose an easy key (C, Am) to reduce theory friction.
Build an 8-bar core loop (30–60 minutes)
Drums + a main chord or riff + a simple hook idea.
Don’t polish—just make it “vibe.”
Add low-end foundation (15–30 minutes)
Write a bassline that supports the kick pattern.
Aim for one clear low-end leader (usually kick + bass working as a pair).
Add harmony support (15–45 minutes)
Pads, chords, or a second instrument that fills midrange gently.
Add melody and/or rough vocal (30–60 minutes)
If vocals are planned, record a scratch take now (even on a phone mic) to guide arrangement.
Create transitions and 8-bar variations (30–60 minutes)
Risers, fills, dropouts, reverse FX, drum fills, automation.
Every 8 bars, something should change: pattern, layer, energy, or space.
Do a rough mix (30–60 minutes)
Balance levels, pan, basic EQ cleanup.
Export a reference version and listen away from your DAW.
Your goal is momentum: structure first, details second.
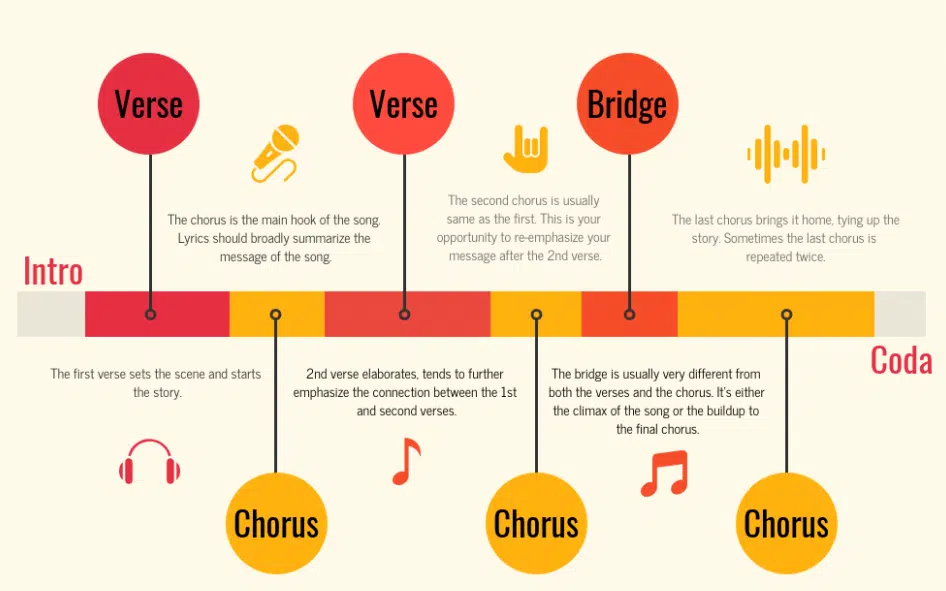
How to turn a 4-bar loop into a full arrangement
If your loop is good but your song never finishes, use the Copy → Subtract → Contrast → Transition method (a reliable way out of “loop hell”):
Copy: Duplicate your loop across the full song length (2–4 minutes).
Subtract: Remove elements to create intro/verse (kick only, hats only, chords only).
Contrast: Make the chorus/drop feel bigger (extra layer, wider pads, higher energy drums).
Transition: Add fills, sweeps, drum breaks, and short “breaths” before new sections.
Two beginner-friendly structure templates:
Arrangement check: if you listen from start to finish, do you hear a noticeable change at least every 8 bars? If not, add a subtraction (mute something), a contrast (new layer), or a transition (fill/FX).
For more home-studio mindset and beginner production context, Gearnews also has a practical overview worth skimming: music production for beginners.
How to choose sounds that don’t fight each other (drums, bass, chords, lead)
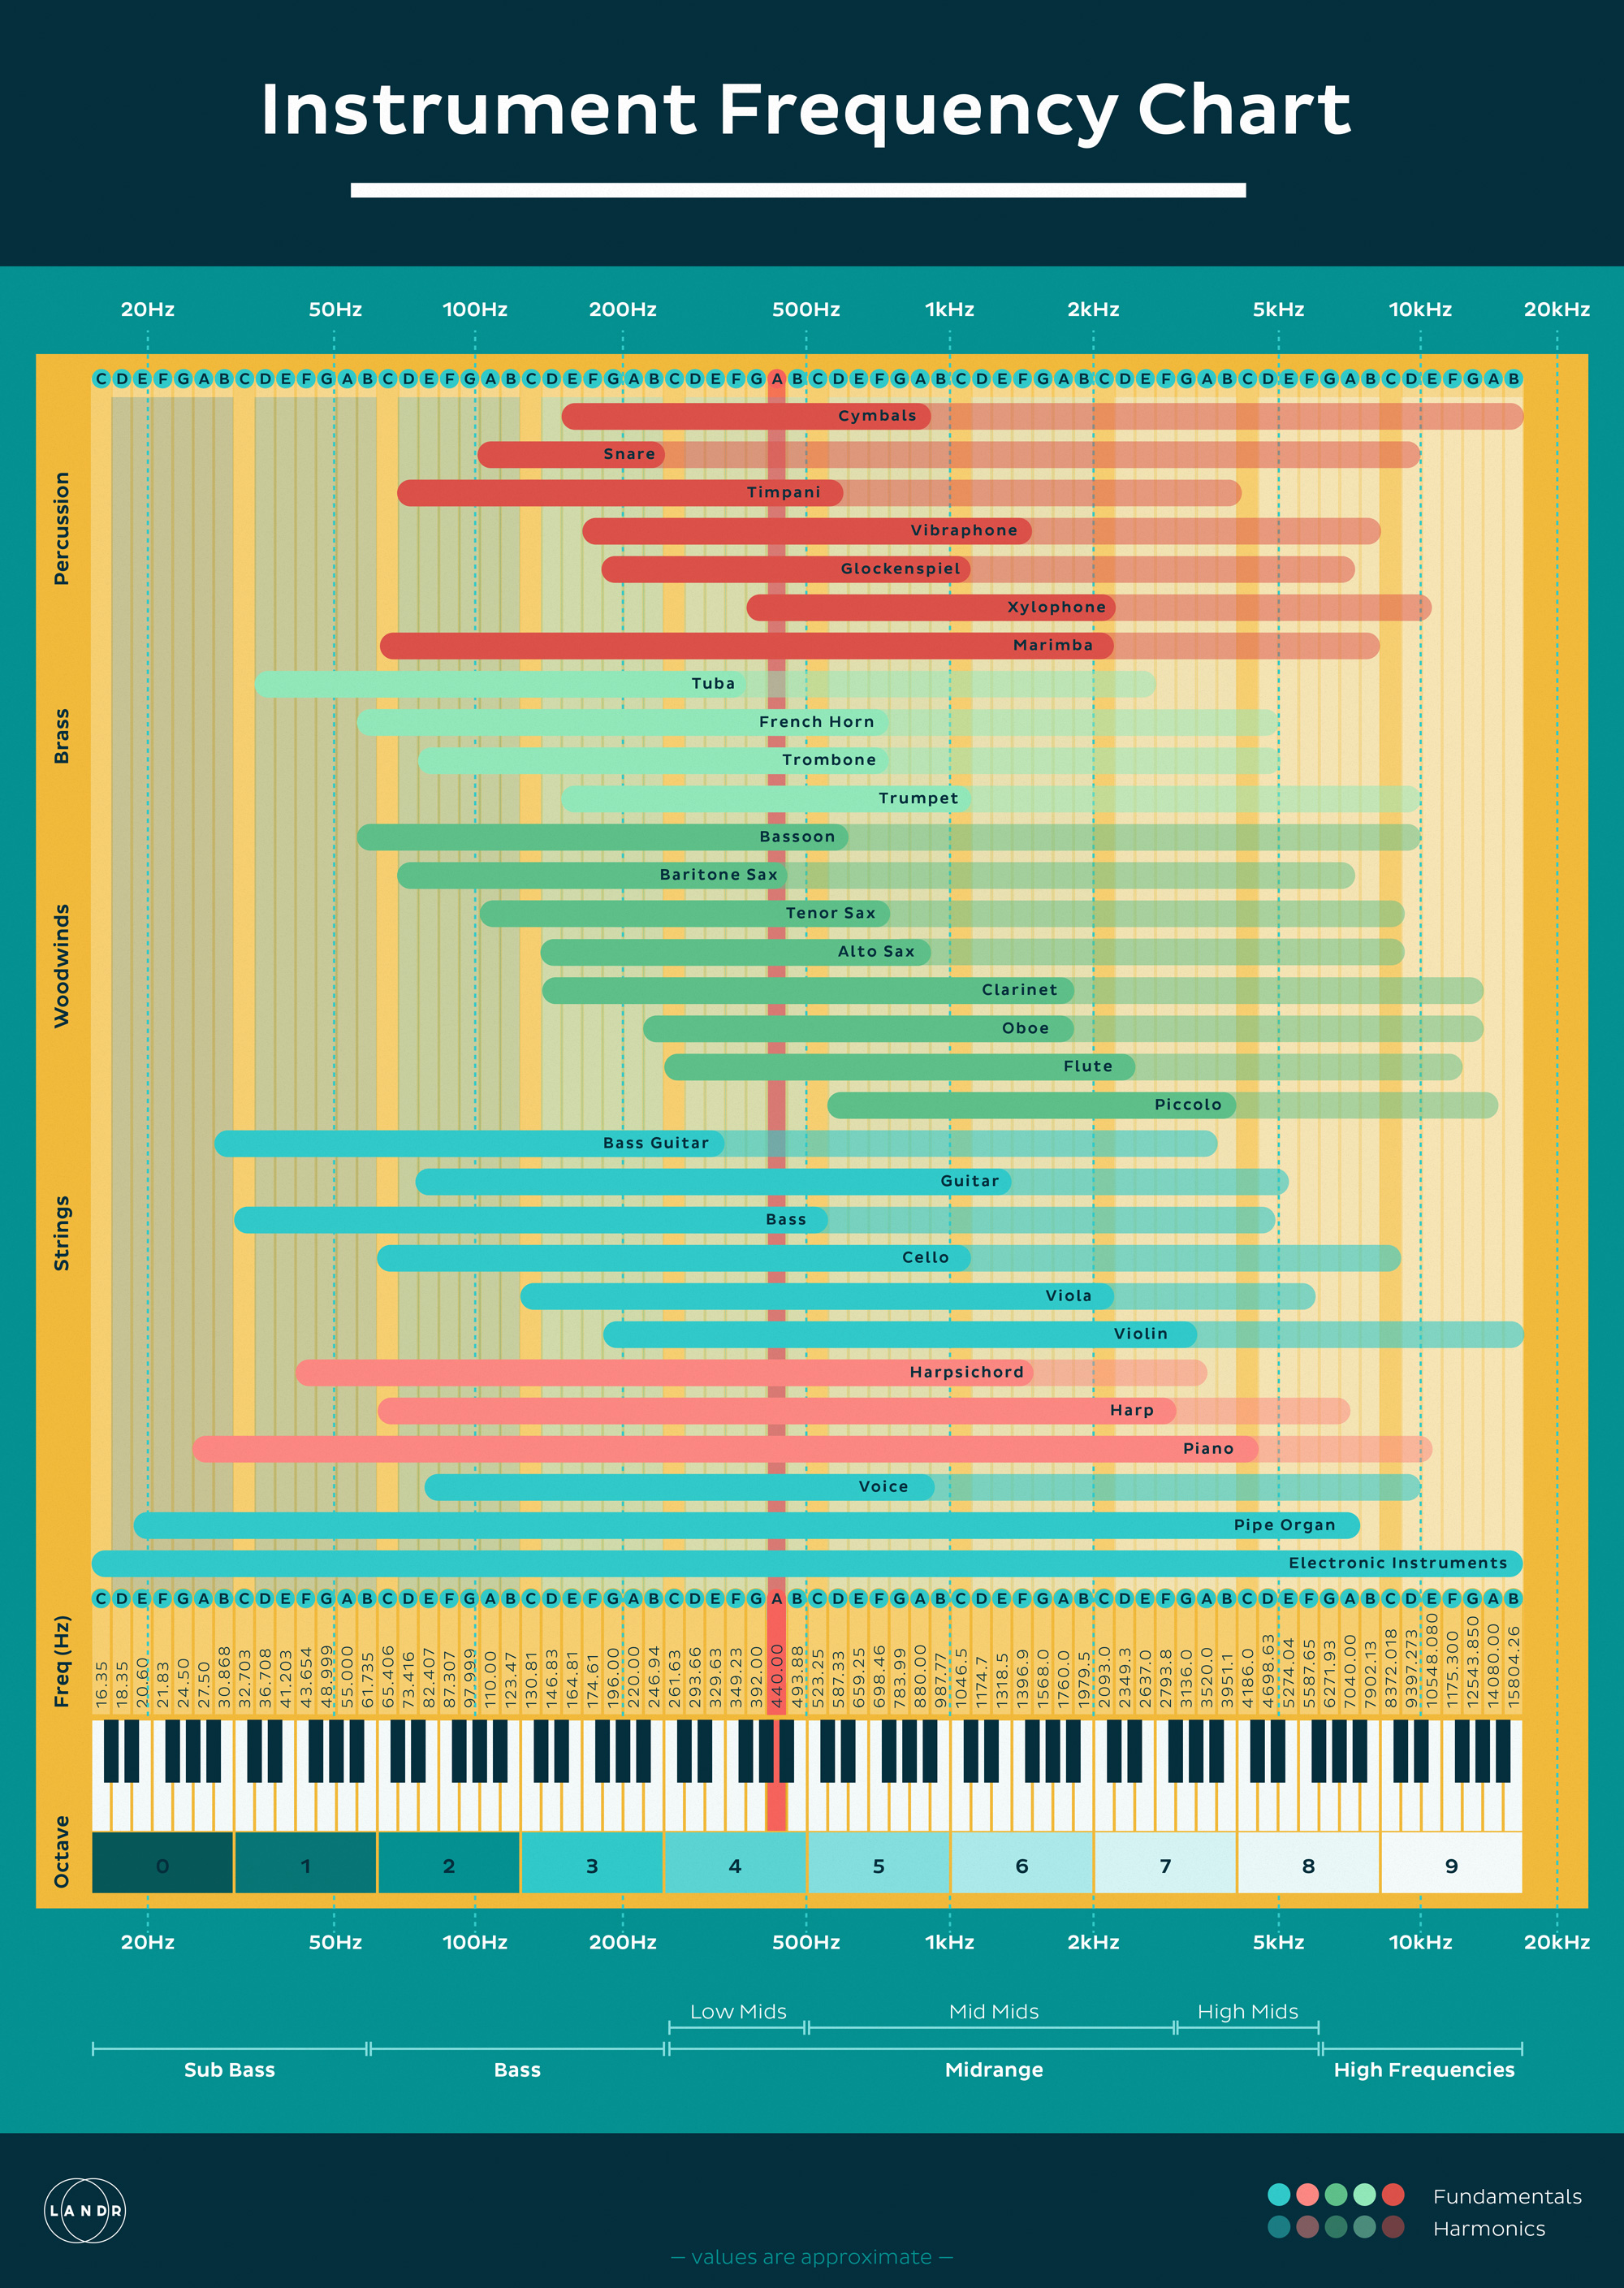
Sound selection is often more important than EQ. Before you reach for plugins, pick sounds that naturally occupy different “roles” in the frequency spectrum and energy.
Start with this role map:
Who owns the low end? Decide early:
If your kick is deep and long, keep bass simpler and tighter.
If your bass is huge and sustained, choose a punchy kick with less tail.
Signs your sounds are fighting:
You can’t hear the bass notes unless the kick stops
The lead/vocal disappears when chords play
Turning things up doesn’t help—everything just gets louder and messier
Want an easier way to turn songs into finished drafts?
Use MelodyCraft to sketch, iterate, and export without getting stuck on the first pass.
How do you record vocals or instruments without ruining the take?
Clean recording is mostly preparation—not expensive gear. If you capture a stable, noise-controlled take, mixing becomes easier and your results improve instantly.
Key beginner principles:
Input level: aim healthy, not hot. You can always turn up later; you can’t fix clipped distortion.
Room noise: turn off fans/AC if possible, close windows, reduce reflections with blankets/soft furnishings.
Mic distance: keep it consistent (often 10–20 cm for vocals), use a pop filter if you have one.
Do multiple takes: record 3–6 full passes, then comp the best phrases.
5-minute pre-record checklist
Set buffer low enough for comfortable monitoring (if needed)
Do a loud test line and watch your meters
Check for background noise (listen with headphones)
Mark a consistent standing/sitting position
Record 10 seconds of “room tone” (useful for editing)
If you’re producing with AI-assisted demos, you can still record real vocals on top—often that’s the best blend: AI for momentum, human performance for identity.
How to mix a song for beginners (levels first, plugins second)
Beginner mixing gets easier when you follow an order that prioritizes audible results over fancy chains. The cleanest path is: levels → panning → EQ → compression → space → buses.
A practical workflow:
Set levels in mono first (so balance is real, not “wide stereo trickery”)
Pan supporting parts away from center to make room (center is for kick/snare/bass/lead)
EQ for clarity (high-pass non-bass elements, remove harsh resonances lightly)
Compress for control (only when dynamics are a problem)
Add reverb/delay with intention (short for glue, long for depth)
Use buses for simple control (drum bus, music bus, vocal bus)
Two habits that speed progress:
Reference track matching: compare tonal balance and vocal level to a song in your genre
Multi-device checks: earbuds + phone speaker + car/Bluetooth
Common problems and quick fixes:
Gain staging basics: what levels should you aim for?
Gain staging is simply keeping healthy headroom so your mix doesn’t clip and plugins behave predictably. You don’t need perfect numbers—just consistent safety margins.
Beginner-friendly targets:
Individual tracks: peaks often around -12 to -6 dBFS (varies by source)
Drum bus/music bus: leave room; avoid constant red peaks
Master channel while mixing: keep peaks roughly around -6 dBFS (or at least below -3 dBFS) to preserve headroom for mastering/export
Practical rules that prevent disasters:
If you see a red clip indicator, stop and fix it (turn down the track or plugin output).
Use clip gain/trim before adding compressors/limiters.
Avoid mixing “into” a limiter as a beginner—it can hide balance problems.
If your master is clipping, turning down your speakers won’t fix it. Clipping happens inside the DAW, and it will export distorted.
How to master and export your track for streaming (without chasing loudness)
Mastering for beginners is about translation and consistency, not winning a loudness war. Streaming platforms normalize playback, so an over-limited master can actually sound smaller and more tiring once normalized.
A simple, safe mastering approach:
Start from a clean mix with headroom (no master clipping)
Use gentle EQ if the whole mix is slightly dark/bright
Use light compression only if it improves glue (not mandatory)
Use a limiter with modest gain reduction (avoid crushing transients)
Export settings (common safe defaults):
WAV (or AIFF), 24-bit, sample rate matches your project (44.1kHz or 48kHz)
If you must deliver 16-bit, apply dithering once (at export)
Pre-export checklist
No clipping on master
Start/end trimmed cleanly (no accidental silence or cut tails)
Compare with one reference track at similar loudness
Listen to the exported file (don’t assume the export matches playback)
What is an AI song generator, and can it help with music production?
An AI song generator can create musical ideas quickly—often full demos with melody, chords, drums, and sometimes vocals. In modern music production, this is best treated as a drafting tool that speeds up the earliest stages: idea generation, mood exploration, chord/melody inspiration, or lyric prompts.
What it can help with:
Generating demo directions (genre, tempo, arrangement vibe)
Chord progressions and melody seeds you can rewrite
Lyric drafts or themes (you refine for personal voice)
Creating references when you don’t know how to describe a sound
What it can’t reliably replace:
Detailed control over performance nuance and arrangement micro-decisions
Consistent repeatability (getting “the same” output twice is hard)
Clear rights in every situation (always check platform terms)
If you want a broad look at popular tools and categories, this overview of the best AI music generators is a useful starting point.
A good mental model: AI gets you to “Version 0.3” fast—you still need to arrange, edit, mix, and make it yours.
How to use an AI song generator in a real workflow (prompt → iterate → edit → mix)
To use an AI song generator without getting generic results, you need (1) structured prompts, (2) iteration tracking, and (3) a plan to edit the output like real production material.
Workflow that actually works:
Prompt with constraints (style, mood, instrumentation, structure)
Generate 5–10 variations quickly
Pick 1–2 winners based on hook potential (not perfection)
Edit: re-arrange sections, replace weak sounds, rewrite melody/lyrics
Mix: balance, space, and translation like any other session
Three prompt templates you can copy:
1) Style + mood + structure
“Upbeat indie-pop, nostalgic but hopeful, 120 BPM, verse-pre-chorus-chorus structure, bright guitars, tight drums, memorable chorus hook.”
2) Instrumentation-led prompt
“Lo-fi hip-hop instrumental, warm Rhodes chords, soft vinyl texture, jazzy bass, simple boom-bap drums, 2:00 length with intro and outro.”
3) Reference-point prompt (without copying)
“Dark cinematic electronic, pulsing bass, spacious drums, slow build to a big drop, tension-release arc, minimal vocal chops, 140 BPM.”
Iteration habit that saves hours: name versions clearly (e.g., “Idea_A_124BPM_minor_chorus2”), and write one sentence about why you kept it.
If you want an AI-assisted starting point but still want to shape the result into a personal track, try MelodyCraft as a quick way to draft ideas and then move into your DAW for detailed production.
What to check before you publish AI-generated music (rights, originality, stems)
Before you release AI-generated music, avoid assumptions. Different tools have different rules on commercial use, attribution, redistribution, and what happens if the model output resembles existing works. Always verify the specific platform’s terms for your use case.
Use this publish-ready compliance checklist:
If your goal is a career portfolio, it’s often best to treat AI output as inspiration, then replace key elements (melody, chords, drums, arrangement, vocals) so the final track reflects your taste and decisions.
What’s a simple music production checklist you can follow every time?
A repeatable checklist is how beginners turn random motivation into consistent releases. Save this and run it on every project—especially when you feel stuck.
A. Before you start (10 minutes)
Pick genre reference (1–2 tracks)
Set BPM + key
Choose a basic structure template (pop or EDM style)
Create a simple sound palette (kick, bass, chords, lead, perc)
B. Arrangement “done” checklist
Full timeline filled (intro → main sections → ending)
Every 8 bars: a change (layer, rhythm, energy, or space)
One clear “hook moment” (chorus/drop/lead phrase)
Transitions placed (fills, risers, drum breaks)
C. Mix “done” checklist
No clipping anywhere (tracks, buses, master)
Levels feel stable in mono
Kick + bass relationship works on earbuds
Lead/vocal sits clearly without being painfully loud
Reverb/delay supports the vibe (not washing everything out)
D. Export/release checklist
Export WAV 24-bit (and MP3/AAC for sharing)
Clean start/end with tails
Listen to the exported file on 3 devices
Save project + stems (if needed) for future revisions
If you do nothing else: finish one track a month for three months. Your fourth track will sound dramatically better than your first, because your workflow—not just your plugins—will improve.
Make Ready-to-Publish Music in Minutes 🎵
Go from idea to finished track quickly. No technical skills required.